![[Flexo Flaw Fixing] Doughnut Effect](https://flexopedia.net/wp-content/uploads/2022/07/067_Doughnut_Effect-1-e1704214721857.webp)
This article is part of the FLEXO FLAW FIXING series
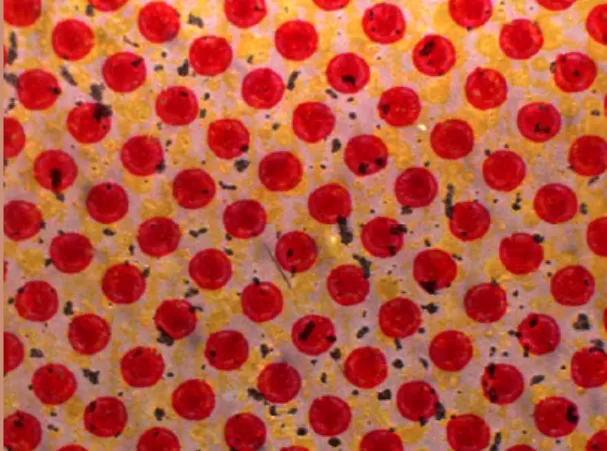
What Is Doughnuts Effect in Flexo Printing?
The doughnut effect in flexo printing, also known as hollow dots, is a major challenge in print quality assurance. This defect manifests the blurred, distorted screen dots or taking on the appearance of uneven doughnuts, affecting the sharpness and clarity of the printed image. Far from the tasty treat its nickname might suggest, encountering this problem as the substrate emerges from the press can cause considerable frustration and financial implications.
Most commonly, this phenomenon occurs when ink collects around small print elements such as dots and small typography, creating hollow shapes, or when inked dots puncture layers of ink applied by previous print stations. It is pretty common in scenarios involving external printing on plastic film with solvent-based inks, using flat-top plates and following colour sequences such as YMCK.
The Causes and Remedies of Doughnut Effect
The causes of the doughnut effect are comparatively limited and surmountable, making troubleshooting less daunting than solving other common flexo printing anomalies. These primary factors include excessive printing pressure leading to plate or cylinder swelling, or the use of overly rigid plates and mounting tapes; printing at too high a speed; ink characteristics that tend to draw too much or are too low in viscosity; and overly voluminous ink application (resulting in overloaded dots) that encounters previous ink layers that have not fully dried.
Excessive Printing Pressure
- Plate or Cylinder Swelling: Often a consequence of aggressive inks and solvents, swelling can cause expansion in printing plates or sleeves. Mitigating this issue necessitates ensuring the compatibility of inks with the substrate material. Expanding drying times could aid in the evaporation of residual solvents. Adopting in-the-round (ITR) elastomer sleeves could provide a robust solution, given their resistance to chemical abrasion, heat, and wear from recurrent usage.
- Hard Printing Forms or Mounting Tapes: Transitioning to more pliable printing forms and mounting tapes can facilitate a more equitable ink distribution, with diminished pressure, thus averting the ink’s extension around the edges of print elements which leads to the doughnut effect.
Excessive Printing Speed
Slowing the pace of the printing press can ensure that each ink layer has ample opportunity for transfer and subsequent drying before the application of following layers. Expedited printing may not allow for adequate drying, provoking the ink to disperse and culminate in doughnuts. A decelerated speed also fosters improved synchronisation between the web and the print cylinder, diminishing the likelihood of image distortion.
Ink Characteristics
- Ink Draw: Modifying the ink formulation through the incorporation of solvents can mitigate its tackiness without rendering the ink excessively fluid. This procedure is instrumental in preventing the ink from drawing or stretching excessively, a common precursor to the doughnut effect.
- Ink Viscosity: Elevating the ink viscosity via careful formulation adjustments can curtail the propensity of inks to spread, thereby aiding in the preservation of doughnut formation around minuscule print elements. This adjustment necessitates fine-tuning to ensure efficient ink transfer from the anilox roll to the print surface.
High Ink Volumes and Unsettled Previous Ink Layers
- Utilise a Lower Volume Anilox Roll: Opting for an anilox roll with a diminished cell volume can restrain the quantity of ink conveyed to the printing plate, and thereby, the substrate. This strategy reduces the risk of excessive ink on small print elements, preventing undue spreading.
- Enhance Drying Times and Methods: Ensuring thorough drying of each ink layer before subsequent layers are applied is crucial. This might entail modifications to drying times, temperatures, or the deployment of more efficacious drying technologies. Complete drying obviates ink layer intermixing, a catalyst for the doughnut effect.
- Review and Adjust the Print Sequence: Altering the sequence in which ink layers are applied, for instance, modifying the colour printing order, could preempt the application of wet layers onto tacky surfaces, thus minimising doughnut risk.
In Conclusion
Remedying the factors that precipitate the doughnut effect in flexographic printing requires a comprehensive and multi-faceted strategy, centred on adjustments in equipment, material selection, and process optimisation. Through meticulous recalibration of printing pressure, deceleration of printing operations, refinement of ink properties, and enhancement of drying methodologies, printers can markedly elevate print quality, obviating this and other parallel printing defects.
This multifaceted approach not only addresses the immediate issue of preventing the doughnut effect but also contributes to a broader strategy aimed at enhancing overall print quality and efficiency. By comprehensively understanding the interplay between different printing parameters and their impact on print outcomes, operators can proactively identify potential issues before they manifest on the press.
![[Flexo Flaw Fixing] Ink Spitting](https://flexopedia.net/wp-content/uploads/2022/11/068_Dirty_Print-jpeg.webp)
![[Flexo Flaw Fixing] Too Strong Colour](https://flexopedia.net/wp-content/uploads/2022/05/Colour_Strength-jpeg.webp)
![[Flexo Flaw Fixing] Screen Dot Deformation](https://flexopedia.net/wp-content/uploads/2022/05/039_Deformed_Dots.png)